Quick Menu


Sunday, 20 March 2011

Mushroom Trifecta Pasta


I first heard the term Trifecta as a University student and quickly learnt that it was related to Horse Racing. You basically pick the horses that will finish first, second, and third in exact order. I was never into horses nor into horse racing so it was with pleasure that I discovered that the term Trifecta is also used to describe a situation when three elements come together at the same time. This is especially true for food where three items come together very nicely. In fact, there is a popular meal that includes beans, rice, and quesadillas that is known as a "The Trifecta."

So, when trying to come up for a name for this mushroom pasta that uses three different types of mushrooms, what better name could I think off than the Mushroom Trifecta Pasta! It sure would sound good on a restaurant menu.


I decided on a Mushroom pasta to get away from the usual and try something different. The kids love creamy pasta and tomato based pastas and usually the mushrooms are a side ingredient rather than the main ingredient. For this dish, three different types of mushrooms make up the main ingredients and there is absolutely no meat in it at all!


Ingredients
5 cloves garlic - chopped
1 large onion - sliced
1 Tbsp Oregano
2 stalks celery - sliced
250g Portobello Mushrooms - sliced
250g White button mushrooms - sliced
250g Oyster Mushrooms - sliced (or torn into pieces)
3 Large tomatoes - sliced
100g Basil Leaves
Salt
Black Pepper

Method
Sautee the garlic, onion and oregano till onion in soft. Add in the celery and continue to cook. Add in the mushrooms and cook till the juices come out. Put in the tomatoes, cover the pan and allow to simmer until the tomatoes are soft and the juices released into the sauce. Toss in the Basil leaves and mix well. Stir in the pasta to coat well. Serve.


I have to say this dish ranks as one of my favourite vegetarian pastas. The mushrooms actually lend and air of 'meatness' to the dish and meat lovers wouldnt really notice that there is no meat in this. Regardless of the meat or no meat, this pasta dish is really tasty and even better, really, really healthy!


Its been a while since I've taken part in Presto Pasta Nights but I'm back with this entry. This week, PPN is being hosted by Claire of Chez Cayenne and of course, Presto Pasta Nights is the brainchild of my friend Ruth over at Once upon a feast. It's good to be back to taking part in PPN and I hope you all like this recipe as much as my family and I did!

Saturday, 19 March 2011

Triple Layer Chocolate Delight


This post is rather late and I realise that I have quite a backlog of posts to clear up. I made this cake for our Christmas Meal in 2010 and I mentioned that although it turned out well, it wasn't as good as I wanted it to be. I had mentioned in that post that:


I had wanted the baked layer of the dessert to be softer but it turned out more like a brownie thanks to me adding in too much flour, forgetting that the cocoa would act as a binder as well. (I redid the layer a few days later and I'll post about that soon - I hope!)


So yes, you realise how late this post is!


This is how I wanted the layer to be. Soft, baked mousse, although in the remake, I left out the walnuts.


This is the full recipe for how it Should be!


Ingredients
For the Base
1 Packs Oreos
50g Butter

For the Baked Mousse
100g Walnuts
4 eggs
170g good quality chocolate
10g butter
120g brown sugar
1/2 cup cocoa
3 tbsp corn flour
1 tsp baking powder

For the Mousse
200g Good Quality Chocolate
3 Tbsp Brown Sugar
3 Egg Yolks
300ml Whipping Cream

Method

For the Base:
Melt the butter and let cool. Crush the oreos and mix with the melted butter. Pack into a 9" springform pan. Bake for 15 mins in a 180C oven. Allow to cool.

For the Baked Mousse:
Melt the chocolate with butter and set aside. Whisk the eggs with sugar till thick and foamy. Add in the chocolate mixture and mix well. Add in the cocoa sifted together with corn flour and baking powder. Turn out into the oreo base and bake for 25 mins at 180C. Remove from oven and let cool.

For the mousse top:
Whip the cream till soft peaks. Melt the chocolate with the brown sugar and whisk in the egg yolks. If mixture seizes, dont worry. Add in the cream a little at a time and whisk till smooth. Fold in to rest of cream and then once cake is cool, spread over the cake.

Allow to chill for at least 4 hours


It really is a lovely dessert and anything with loads of chocolate and nuts is a winner in my book. You may want to double the ingredients for the oreo base as I thought more Oreos would make the dessert taste even better.

Remember that the pictures are the original attempt and not how the edited recipe would appear. Try and picture a combination of the mousse top and the baked mousse cake shown earlier and you get the idea. Sorry if I'm complicating things!

Monday, 7 March 2011

Double Choc Chip Muffins


Sometime in mid January, the kids wanted something to munch on. They were also a little 'concerned' about what they could take to school for break time. The 'concern' came from the fact that school was into its second week and they were tired of their usual ration of cookies.

I asked them if they would like me to make them something. Their eyes lit up and they asked me what I was going to make. I first thought of making my usual Choc Chip Muffins but then I decided that I would try something different. I suggested Double Choc Chip Muffins and they both looked at me enquiringly.

My little princess asked if that meant that there were Double the amount of Choc Chips, so I explained that Double Choc Chip Muffins meant that the cake was chocolate AND there were Choc Chips in it. That's what the double meant. Both of them responded with a resounding "Yes Please!" This was quickly followed by "Can we help?"


And help they did! They helped to measure the flour, beat the mixture and of course their most favourite part was licking the bowl and utensils clean. This is what we did:

Ingredients
250 g butter
2 cups sugar
4 eggs
2 tsp vanilla
1 cup cocoa
1 cup cake flour
3/4 tsp baking powder
100 g Choc Chips

Method
Melt butter and cool. Beat melted butter and sugar till well combined. Add in eggs a little at a time. Beat till creamy
Sift flour together with baking powder and cocoa.Fold into cream mixture.
Add in vanilla and choc chips. Mix well. Divide equally into muffin cases. Makes about 12 large muffins
Bake in a preheated oven at 180oC for 35 minutes or till done.
Remove from oven and cool


The muffins were absolutely delicious. Very chocolatey, very moist and quite rich too. In retrospect, it would have been better to make them in smaller muffin cases as even eating just one was very filling.


The muffins were eaten for dessert that very night and they went great with ice cream. The next morning, both kids took a muffin each to school and the day after as well!

Wednesday, 23 February 2011

Hot Fudge - Homemade and Completely Natural


In my post about my Daughter's Birthday Dessert Cake I mentioned that I had made a Hot Fudge topping and that I would soon post about it. This is that post!

I have also previously posted about Hot Fudge or Choc Sauce but the difference is in the ingredients, in how it is made and most importantly how it tastes.

I've never really liked the fact that my first recipe uses Liquid Glucose / Corn Syrup to thicken the mixture. I kind of felt that it wasn't terribly healthy and to this day I don't really know what goes into Liquid Glucose. So, some time ago, I tried something out that has changed the way I make my Hot Fudge.

Rather than using a thickening agent like liquid glucose or corn syrup, I wondered what would happen if I started off with making something that was already thick and then thinning it down a little - something like a caramel sauce.


So I made a caramel, added in some butter, then some cocoa and then some milk. IT turned out brilliant and tasted like any store bought or restaurant found Hot Fudge. As I said before I've made this many times but I've never really measured anything out. This time I did and this is the recipe.


Ingredients
8 Tbsp Sugar
75g butter
10 Tbsp Cocoa Powder
1.5 Cups Fresh Milk
2 tsp vanilla
Method
Melt the sugar in a saucepan with a little water to make a light caramel. As soon as it turns golden, reduce the heat and add in the butter, being careful as it may splutter. Stir well and add in the cocoa. Mixture will thicken considerably and may even get lumpy. Dont worry at this stage. Add in the milk and using a whisk, stir the mixture until well combined and smooth. Keep stirring over medium heat until the mixture thickens nicely. Add in the vanilla.

You may need more cocoa or sugar depending on your taste and this can be added in once the mixture has cooked and is thick. The Hot Fudge keeps really well in the fridge and you just need to zap it for a few seconds in the microwave or reheat it over low heat.


It's brilliant with ice cream or as an accompaniment for waffles, cake or practically anything that needs hot fudge! You can even add in some other flavouring instead of vanilla like orange essence or even some rum or brandy for extra flavour. Say goodbye to canned/bottled hot fudge or chocolate sauce and start making your own!

Monday, 21 February 2011

A Princess turns 7 (with lots of pictures...)


My little Princess turned 7 on the 17th February. As per usual practice with both the kids, we hid her presents under her bed before waking her up. We sang Happy Birthday and although sitll groggy and half asleep, she slipped off the bed to check out what loot there was under the bed.


Regular followers of my blog will know that my little princess is not your typical princess. She doesn't like Barbie or any other dolls, she hates dressing up and she loves Football - that's why she had a Football themed Cake last year. She also loves NERF guns and so we got her a NERF Dart Tag set in addition to a few other smaller presents.


She was rather delighted with the NERF Dart Tag set and couldnt wait to try it out. The set comes with a small NERF gun and a target board - like a dart board. It also comes with a pair of glasses that they call "Vision Gear".


Sarah was quite specific in how she wanted to spend her birthday. Firstly, even
though it was a school day, she asked that both The Lovely Wife and I take leave from work so that we could pick her from school and then go for lunch.

Secondly, she requested a gathering of the extended family for a small dinner on Thursday night. This was compounded by the fact that we had a Wedding Reception on the following Saturday (19th) where we would usually have had a birthday celebration. So, seeing that we couldnt celebrate her birthday on Saturday, we agreed to invite everyone over on Thursday, her actual birthday.

Thirdly, Sarah knew exactly what she wanted for the meal. She wanted a Hot Dog party!


We served the sausages with with Hot Dog buns, relish, tomato sauce and mustard, rather yummy. But with about 17 people to feed, Hot Dogs weren't enough! The Lovely Wife wizzed up her version of the California Pizza Kitchen BBQ Chicken Salad, (something she has made before and I thought I had posted about but looks like I didnt - so look out for it!) that was indeed delicious.


Together with my Mother-in-Law, The Lovely Wife also whipped up a dish of Fried Noodles.


My mom had also ordered some Chicken Curry Puffs.


So indeed, there was rather a lot of food!

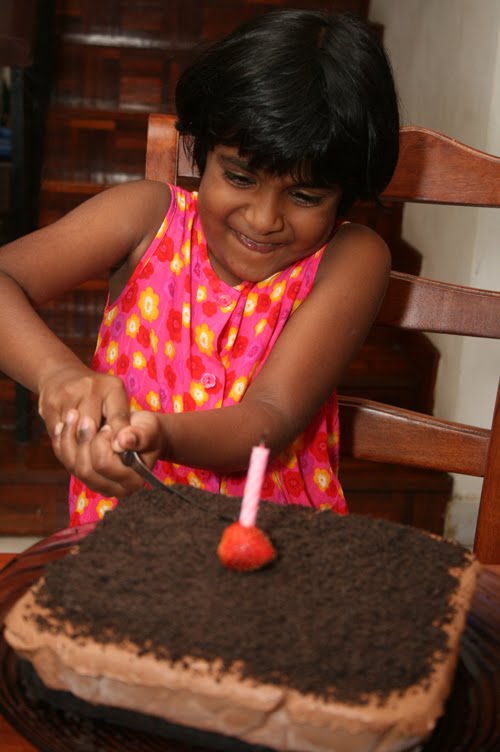
After indulging in the food, Sarah cut her cake. As I said in my previous post, this time around, Sarah wanted a Dessert Cake and not an iced and decorated cake. She was also quite specific that she wanted me to try and replicate the Fridays Mocha Mud Pie. She insisted on wearing her Vision Gear to cut the cake but I later insisted she take it off so that we had a nice picture of her! (see previous post)


She also wanted The Lovely Wife's Fruit Tarts with grapes and strawberries


and of course the Birthday Cake,


It was certainly a lot of work getting everything ready but then that's what Mummy's and Daddy's are for! All our guests enjoyed the birthday dinner and most importantly, My litte princess was very, very happy!


Happy 7th Birthday Sarah!

Friday, 18 February 2011

Mocha Mud Pie for Sarah's Birthday


My litte princess turned 7 yesterday. We had a gathering of the family and both The Lovely Wife and I made a few dishes for her. I'll post about the meal in my next post but first, the cake....

My little girl is growing up fast and as she grows up, her tastes are getting more and more mature. This time around, she wanted a Dessert cake rather than an iced and decorated cake. She said that although the iced and decorated cakes were nice, they weren't as much fun to eat. Smart Gal!

One of her favourite dessert cakes is the Mocha Mud Pie that you get at TGI Fridays. We all enjoy that dessert and its basically a large chunk of Coffee and Chocolate ice cream with an oreo base, covered with oreo sprinkles and served with Hot Fudge and Almonds. That's what I think it is anway!

As search for TGI Friday's Mocha Mud Pie didn't provide much in terms of recipes so I thought I would wing it and come up with something of my own. Everything is home made with the exception of the Oreo biscuits!


This dessert cake is rather cumbersome to make as there are so many components to it. As I said, since everything was home made, it took quite a bit of doing and quite a bit of time. To save time, I made a batch of chocolate ice cream and then halved it. I added Instant Coffee to the halved batch to make a Mocha Ice Cream and then layered that on top of the Chocolate Ice cream. If you dont want to make your own ice cream, just use equal amounts of Chocolate and Coffee Ice Cream. You can also opt to buy your own Hot Fudge but I prefer to make my own.

Ingredients
For the Ice Cream
700ml Cream
300g dark chocolate
8 egg yolks
150g caster sugar
600ml fresh milk
2 tsp Corn Flour
3 Tbsp Coffee
1.5 Tbsp Sugar
3 Tbsp Cream

For the Base and topping
3 packets of Oreo Biscuits
50g butter

almonds for topping
Hot Fudge (recipe will be provided in another post)

Method
Whisk the egg yolks, sugar and conglour together. Bring milk to the boil and then gradually mix a little into the egg mixture to temper it. Pour the egg mix back into the rest of the milk and cook over a gentle heat, stirring constantly until custart thickens and is smooth. Remove from heat.
Add in the chocolate and stir till melted. Allow to cool then chill.
Whip cream until it forms soft peaks and then fold into the chocolate mixture. Half the mixture and set aside.
Heat 3 tbsp cream then add in the coffee and 1.5 Tbsp sugar till it dissolves.
Add in the coffee mix to one half of the mix.

If using an ice cream maker, churn till firm.
Else, freeze mixture and then beat every few hours to remove the ice crystals and make the ice cream smooth

To make the base and assemble:
Line a 9 inch round or square pan with greaseproof paper, allowing the paper to come up the sides. This is so you can remove the cake and plate it later. Melt the butter and let cool. Process 2 packets of Oreos till fine crumbs. Add in the butter and press on to the pan. Chill in freezer for 10 mins till firm.
Remove the ice cream from freezer and allow to thaw till slightly soft. Cover the oreo base with one layer of chocolate ice cream and then cover that with a layer of Mocha/Coffee ice cream. Place in the freezer to set overnight or at least 8 hours. Before serving, crush the remaining packet of Oreos and cover with hot fudge and almonds.


It took a while to make the ice cream and wait for it to set and all that but I was able to do different bits over different times. The actual assembly didnt take too long either and I left the Hot Fudge and Almonds aside to place on each serving as that way, I could keep the cake in the freezer without the hot fudge freezing.

Since the cake was pretty much frozen, we could'nt stick a candle in, so I decided to stick a candle in a Strawberry and just place that on the cake.


The cake was very well received by everyone and Sarah was a happy little girl! I'm pleased that I managed to kind of replicate the TGI Friday's Mocha Mud Pie and I hope that anyone else looking to make a home made version tries this recipe out and please tell me how it goes. Both my kids think that this version is pretty true to the original and they actually prefer mine as the ice cream is creamier and not so icy.

There was sufficient cake to last for dessert the next day and I still have a small bowl filled with the Mocha Pie to last us over the weekend!

I'm glad you liked the cake Princess although Mummy insists its not a cake and is more an ice-cream dessert...

Happy Birthday Sarah!